Table of Contents
Once you’ve finished setting up a program with Easy Affiliate, you might be eager to launch it right away. However, there may still be unforeseen issues you’ve missed. Having to deal with these problems when your program is already running can be disastrous to your bottom line.
For this reason, it’s very important to ensure that your program works exactly as you expect before you launch it. This means testing every element and step thoroughly. You need to make sure that nothing is left to chance, in order to have a frictionless launch.
In this article, we’ll show you how to test drive your Easy Affiliate program. Let’s get to work!
Why It’s Important to Test Your Easy Affiliate Program
If you’ve used Easy Affiliate to create your own affiliate program, you will doubtless be eager to get it off the ground. However, while we’re sure that you’ve spent a lot of time making sure to configure all aspects of the program correctly, it’s difficult to account for everything that might go wrong.
This is why testing is so important, especially when it comes to affiliate programs. If you don’t thoroughly evaluate your program, you may end up leaving in issues that could cause significant problems once affiliates start using it. For instance, you could find that the wrong commission rates are being applied, or that clicks are not registering properly.
Having to fix these issues later on can disrupt your program, frustrate your affiliates, and cost you both financially and professionally. Thankfully, testing doesn’t have to be complicated. Easy Affiliate makes the process relatively simple, so you can spot and deal with any unexpected issues well in advance of your launch date.
How to Test Your Easy Affiliate Program (In 4 Steps)
Now, let’s look at a simple but effective way that you can test your affiliate program. For this to work, you’ll obviously need to have a program set up using Easy Affiliate first.
As part of this test, you’ll be completing a test purchase to make sure that it registers correctly. We’ll be using a WooCommerce-powered site in our example, but keep in mind that Easy Affiliate also supports a number of other e-commerce platforms.
1. Set Up an Affiliate Link
First, you’ll need to create at least one affiliate link (or banner). To do this, access Easy Affiliate > Creatives in your admin dashboard:
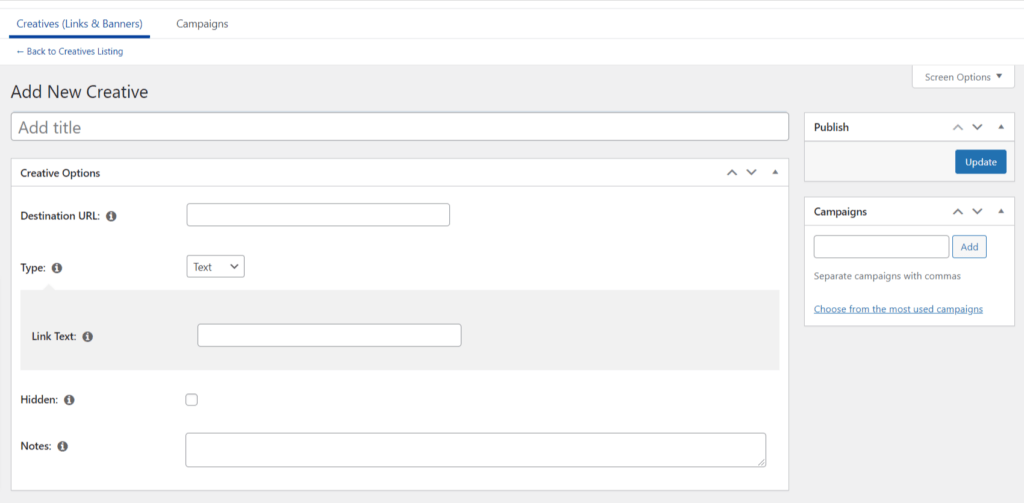
Add a test title and destination URL, along with some text text, and click Update. Now you’re ready to use this link to test your program!
2. Create a Dummy Affiliate Account
In order to test that your program works correctly, you’ll need to create a new user. This will be a dummy account that represents an affiliate, so you’ll want to set the user role to Subscriber:
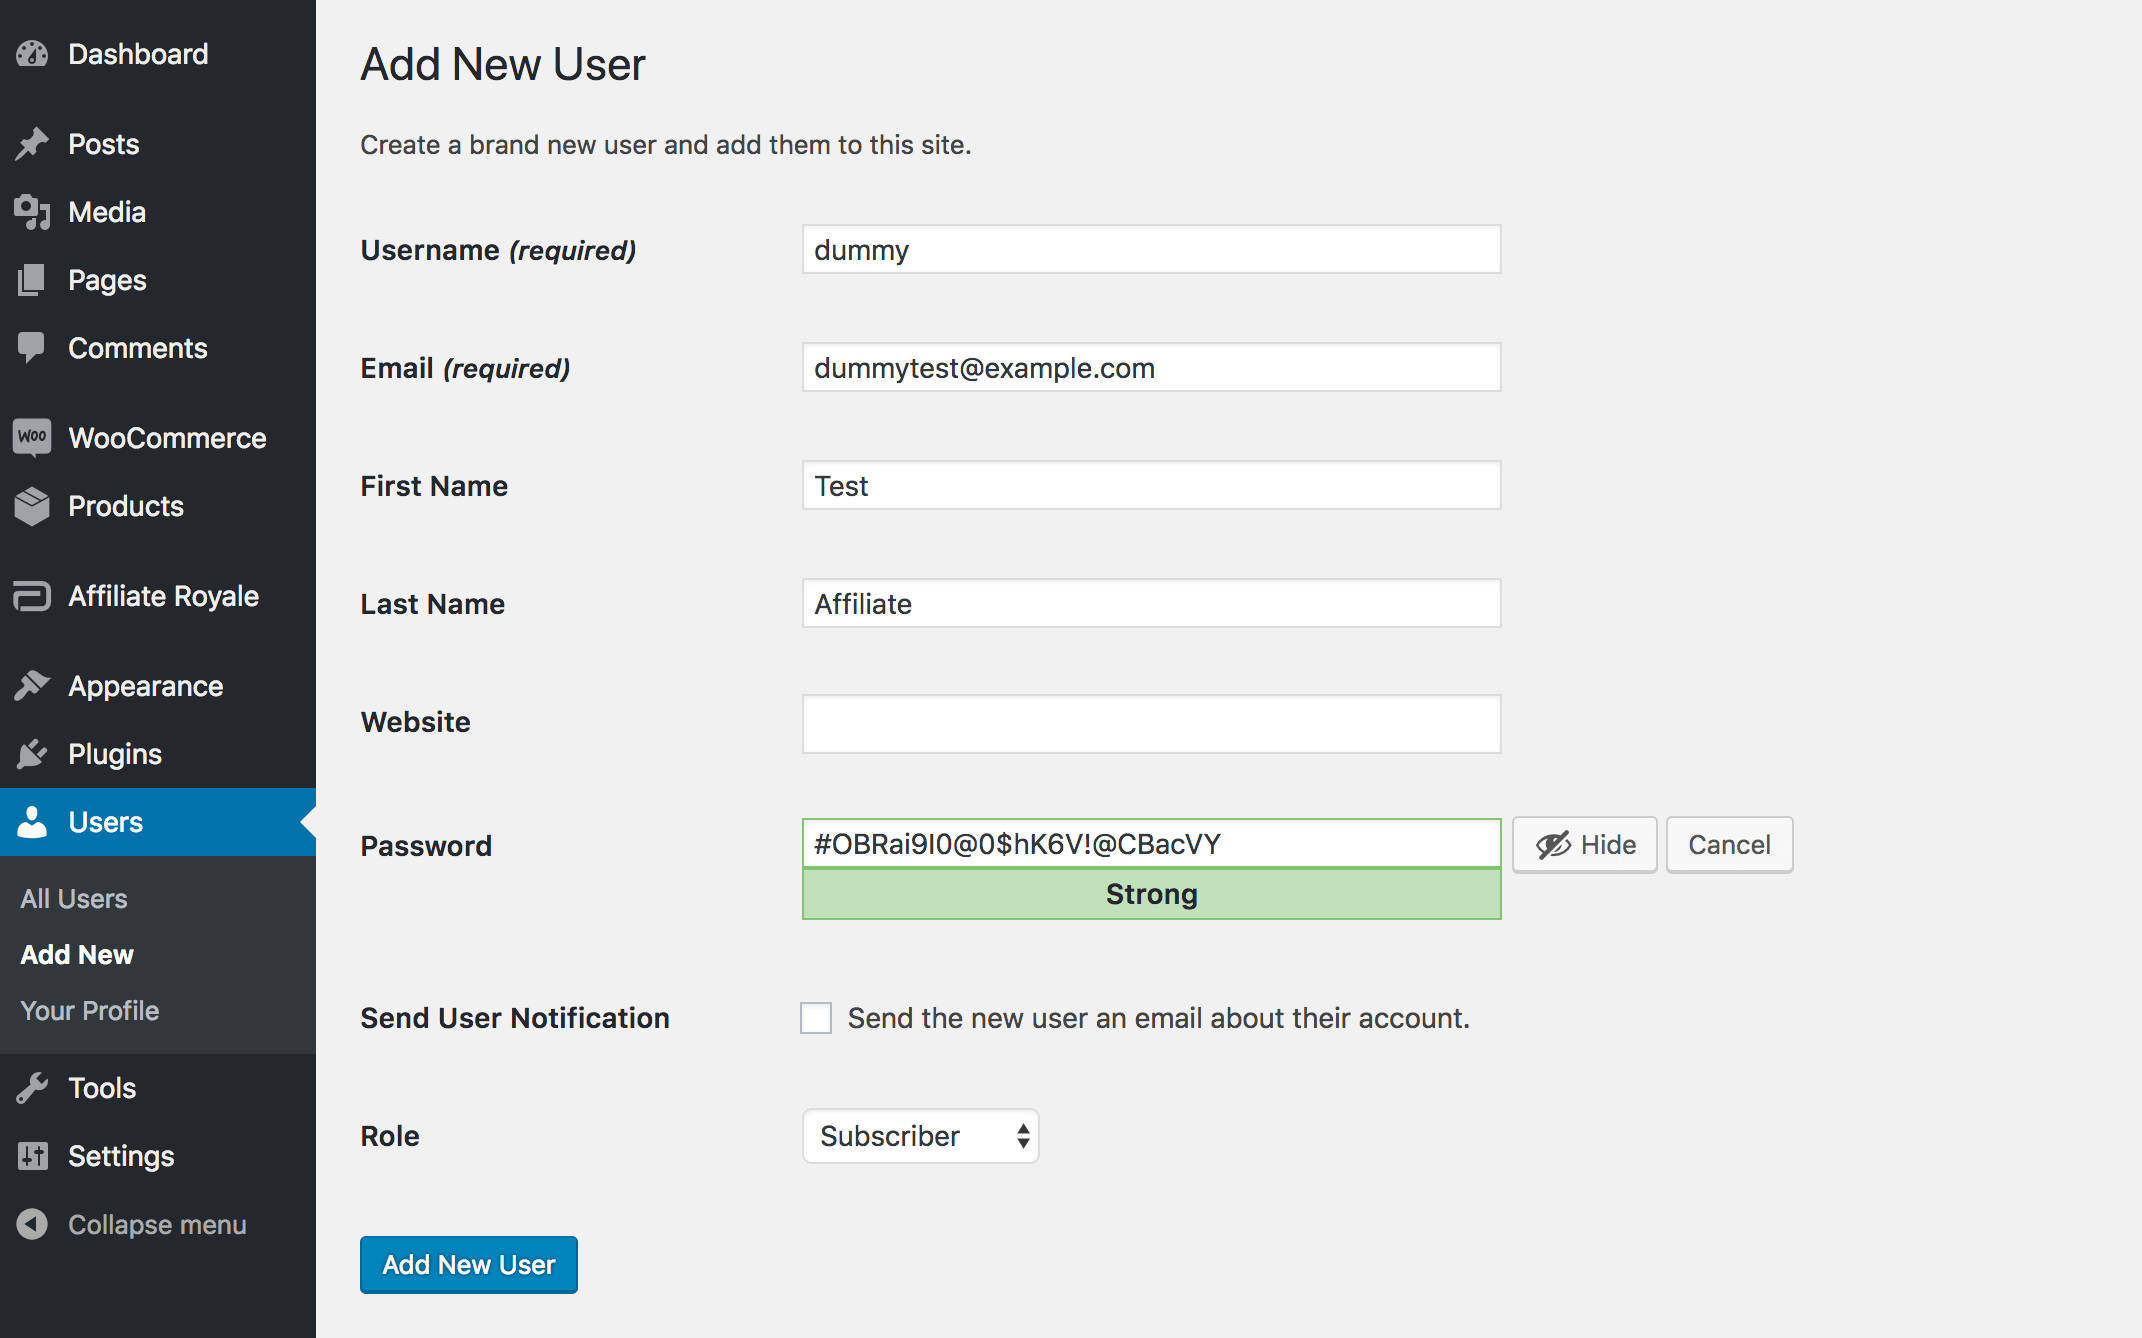
Since this account is only for your benefit, you can set it up with fake details. You obviously don’t need to send an email notification either. Just remember to save the password.
Once you’ve added this user, sign out of your own admin account, and sign in using the test account. Then navigate to your affiliate dashboard, Links & Banners, where you’ll see the link you just created:
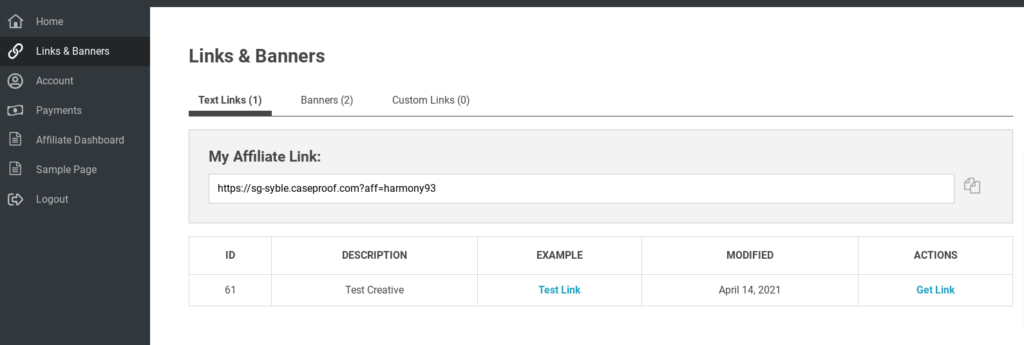
Copy this link, and then sign out of your dummy account. It’s very important that you do this, as you cannot be logged in to the affiliate account when using the link.
3. Make a Purchase
Once you’ve logged out of all your WordPress accounts, open up a new browser window. Use it to access your site, by pasting the dummy account’s affiliate link into the browser bar.
Next, complete a purchase like normal. Naturally, you won’t need to honor this purchase, so you can use any payment method you want. Remember that if you select Cash on Delivery or a similar option, you’ll need to manually complete the order before it will be recorded properly:
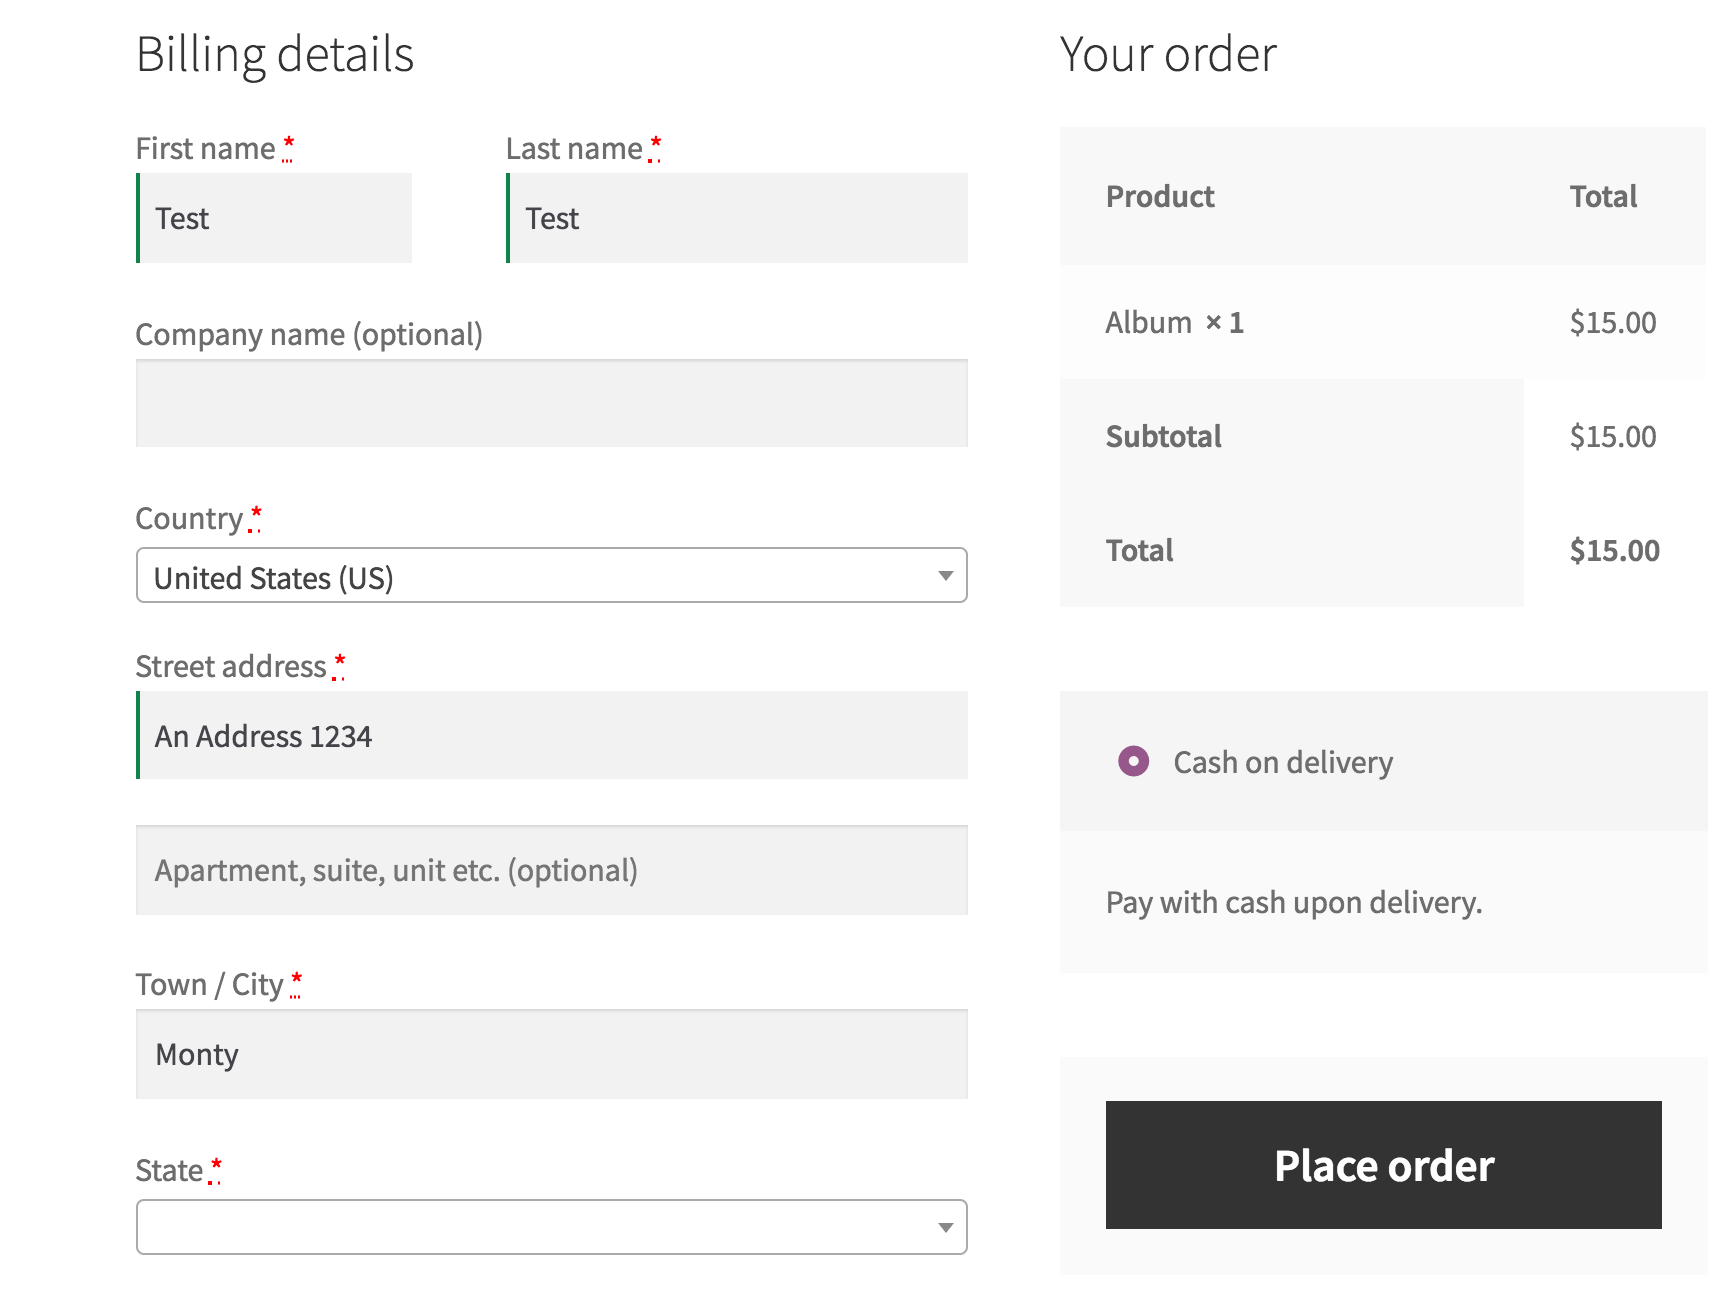
If everything is working so far, you’re on the right track. However, it’s now time to see if the affiliate link recorded the purchase properly.
4. Check to Make Sure the Purchase Was Recorded Correctly
Now, we’re going to see if the affiliate link worked as expected, for both the dummy affiliate and for the admin user (i.e. you). Let’s start with the affiliate, so sign in using your dummy account details once again. Then open your Stats, where you’ll see the amount of clicks and sales your links have accrued.
If everything has gone according to plan, you’ll see your purchase appear next to today’s date.
If it doesn’t show up, the purchase may not have been properly completed. You can check this by signing in with your admin user account and examining the order. However, if it does appear, you’ll know that the link functioned perfectly.
Next up, you need to check to make sure the link is also working for program admins. Log out your affiliate account, and log in using your own credentials. Then, go to Easy Affiliate > Transactions, and make sure the transaction was recorded:
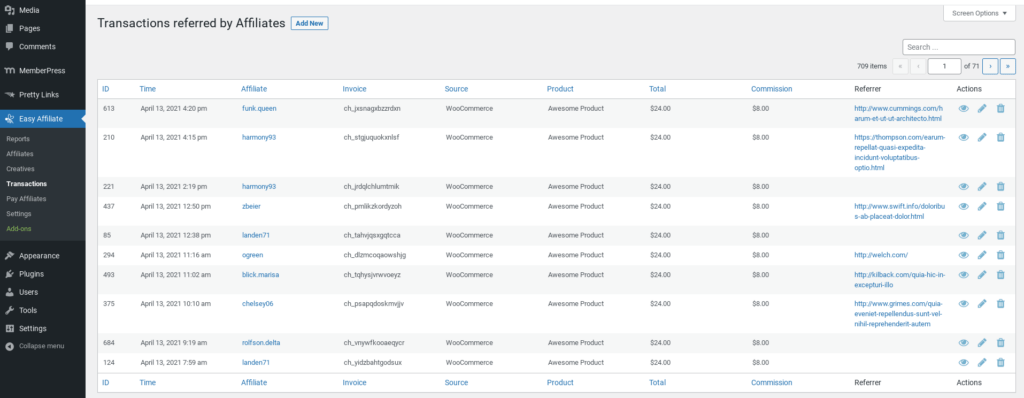
Again, if the purchase does not appear, you may need to ensure that the link has been properly configured with the correct target URL. You should also make sure that you were signed out of your accounts when you used the link.
If the report does show the transaction (which it should), then congratulations! Your affiliate program and links are working as expected, and you should be ready to launch.
Conclusion
Once you’ve created your Easy Affiliate program, you still have one step left to take. To avoid frustrating your affiliates and experiencing nasty surprises down the line, you’ll want to spend some time testing your program before launch. That way, you can rest assured that it is performing as you’d expect.
In this guide, we’ve covered the steps necessary to test a program created with Easy Affiliate. You’ll want to:
- Set up an affiliate link.
- Create a dummy affiliate account.
- Make a purchase.
- Check to ensure that the purchase was recorded correctly.
Do you have any questions about testing your affiliate program? Let us know in the comments section below!
If you liked this post, be sure to follow us on Twitter, Facebook, and LinkedIn! And don’t forget to subscribe in the box below.


Leave a Reply